BTX Cloud Mobile User Guide for Android
Mobile App User Guide
There are 2 ways to install the BTX Mobile App:
- Under the application Module, select Mobile Download.
- Scan the code using a QR Reader on your mobile device

Directly from the App Store or Google Play Store
Download the CoreNexa Mobile app From the Google Play Store
Follow the instructions to install
Once the app is installed on your device:
- Tap the CoreNexa mobile Icon
- On the sign in screen there are 2 ways to sign in:
b. Scan the QR code in UC Client

Navigating Around the App
The main screen is the list of menu options that provide all the functionality of the app.
As you click into each menu item, click on the menu icon

to be taken back to the main menu
Landing Screen
Once Logged in for the first time the app will land you on the default landing screen on the Dial pad. Subsequent visits will take you to the last menu option that you closed the app on.
From the landing screen you can perform the following:
- Make a call
- View your Call History
- View/edit your contacts
- Search by name, phone number or extension
Dial Pad
Use the Dial pad to place calls
- The following actions are available while on a call:
a. Mute
b. Dial Pad
c. Audio – switch between microphone, speaker and connected bluetooth devices
d. Hold
e. Record (if enabled)
f. Transfer

Audio
While on an active call you can switch between microphone, speaker and connected bluetooth devices.
To switch press the audio button and select which option you want to use by pressing that option

Call Waiting
While on an active call you have the ability to receive a second inbound call. When the call arrives, you will be presented with a screen to make the following selection:
- Hold & Accept
- End & Accept
- Decline

Recent Calls
Recent call provides a view of all incoming, outgoing, and missed calls.
At the top of the screen there are two tabs: All & Missed
- All will display all types of call activity
- Missed will provide only missed calls

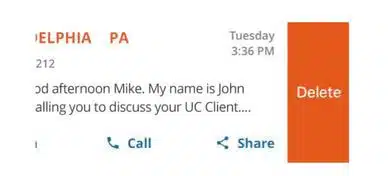
Each entry will provide the following:
- Direction of call
- Name / Number
- Date & time
- Ability to call
- Ability to create contact

Contacts
Contacts are organized under 4 tabs:
- Favorites
- Corporate
- Personal
- Local
1. To favorite a contact, click on the contact entry and select the Favorite icon
2. To share a contact,click on the contact entry and select the Share icon
3. To call a contact directly from the contact entry, press the phone icon

Search
Search through your Contacts and Recent Calls by Name, Company name, phone number or Extension. Start typing and all matches will appear.
For example, if you type in john, then all matches that have John will appear. As you keep typing in additional numbers the search will narrow down.

Voicemail
1. Click on the Voicemail menu item to see your visual voicemail.
The following information is available for each voicemail received
- caller ID: the name & number of the person that left you a voicemail
- date & time
- voicemail transcription (if enable
2.The following information is available for each voicemail
- listen to the voicemail
- callback
- send voicemail to email

- Delete by sliding voicemail entry to the left
- To delete multiple voicemails:
- Click avatar of one of the voicemails for deletion. You will notice a checkbox appears
- Select the other voicemail(s) you want to delete
- Click Delete icon in the top right hand corner

- To delete all simply click Select Alll checkbox in the top left hand corner the click the Delete icon


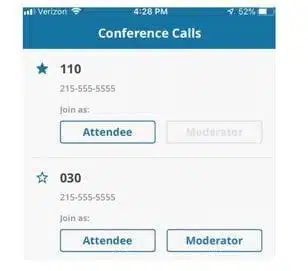
Provides a quick and easy way yo moderate or attend a conference call.
- A list of all conference call rooms will be provided.
- Simply find the conference call you wish to moderate or attend and select the Attendee or Moderator button. The call will be instantly connected.
- if there is a conference call bridge you frequently join simply click on the star to make it a favorite and it will appear at the top of the list.
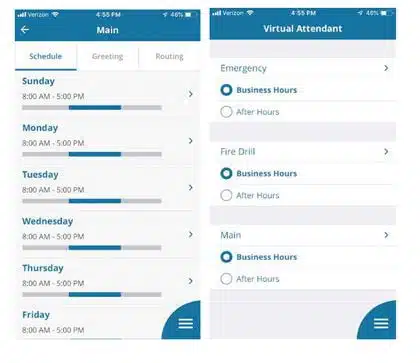
Virtual attendant serves as a virtual receptionist that greets customers while routing then to an available employee or to alternate devices of the employee they are trying to reach. The BTX Cloud CoreNexa mobile provides the ability to perform this directly from the app.
- Select the Virtual attendant
- Select the Business Hours or After Hours
- make changes to Schedule, Greeting, or Routing
Settings
Control Data Usage
if you want to control your data usage while using the CoreNexa Mobile app, you can select the desired data network with which to make and receive calls.
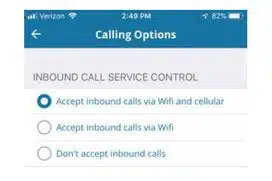
Inbound Calling
the inbound calling option allows the ability to set inbound call control:
- Accept inbound call via Wifi & Cellular
- Accept inbound calls via Wifi
- Do not accept inbound calls
Allows the ability to stop notifications, alerts, and calls.
- To turn on: turn slider to right

Call Forward Always
Enables call forwarding to a preferred location.
- To turn on – Click on the option
- Select the Destination type
- Click Save
- When you go back to the main settings screen, the Call Forward Always icon will display “On”

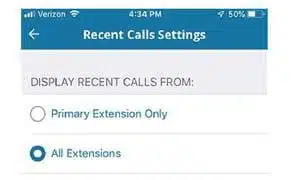
Recent Calls
Display recent calls from preferred extension. if you have more than one extension, select he “all Extensions” option.
For more support Please call or visit https://www.btxchange.com/btx-cloud-support.html
BTX | Business Telephone Exchange
929 Berryessa Rd Suite#10 San Jose, CA 95133
Phone (408) 200-7810 Email support@btxchange.com | Website www.btxchange.com
IP/PBX | SUPPORT | SERVICE | SOLUTIONS